Last Updated on April 14, 2024 by Irena Domingo
Obtaining the unified e-visa (or electronic visa) to Russia is very simple and quick: you will only need your passport, travel medical insurance and a digital photo. However, the e-visa can only be requested by some nationalities. From August 1, 2023, the unified e-visa is valid throughout Russia. I explain step by step how to obtain an electronic visa to Russia easily and cheaply (54 dollars).

I'm going to talk about ...
- 0. THE BEGINNING OF THE IMPLEMENTATION OF THE E-VISA IN RUSSIA
- 1. SOME CONSIDERATIONS ABOUT THE ELECTRONIC VISA
- 1.1. What is the Russian e-visa?
- 1.2. How much does the Russian e-visa cost?
- 1.3. Which e-visa categories exist?
- 1.4. What nationalities can apply for the e-visa to Russia?
- 1.5. Which regions of Russia can be visited with the e-visa?
- 1.6. Should I enter and exit through the same checkpoint?
- 1.7. Which is the duration of the e-visa?
- 1.8. When can the e-visa be requested?
- 1.9. How long does it take to issue the e-visa?
- 1.10. Where is the e-visa requested?
- 1.11. Am I required to stay in the hotels or apartments that I have included in the electronic visa application?
- 1.12. Can I stay in apartments or private houses of friends or family?
- 1.13. What if I travel with minors?
- 1.14. Is it mandatory to apply for an electronic visa if I already have a traditional visa?
- 1.15. In which cases can I not apply for the e-visa and must I apply for a regular or traditional visa?
- 2. STEPS TO OBTAIN ELECTRONIC VISA OR AN E-VISA TO RUSSIA
- 3. ARRIVING TO RUSSIA
0. THE BEGINNING OF THE IMPLEMENTATION OF THE E-VISA IN RUSSIA
Many countries around the world already use the electronic visa system (e-visa) to authorize foreign citizens to enter their country. For example, former Soviet republics such as Armenia, Azerbaijan, Tajikistan, Uzbekistan or Georgia already use this system.
It is also used by countries such as Turkey, India, Australia or the United States (called ESTA), to name a few examples.
The truth is that the global trend is towards the extension of the electronic visa, due to the advantages that it offers.
Russia began to implement the electronic visa system in August 2017, through a pilot project, in the regions of the Far Eastern Federal District, though limited to citizens of 18 countries.
In July 2019, this pilot project was expanded for the Kaliningrad region and for citizens of 55 countries, including European countries in the Schengen area.
In October 2019, it was expanded again for the Leningrad region, whose administrative center is St. Petersburg, also for citizens of 55 countries.
Since August 1, 2023, this electronic visa system has already been extended to all of Russia, including, therefore, its capital, Moscow or Crimea.
It can also be said that it is a system that has already been used in some sporting events, such as the 2018 World Cup or the Sochi Olympics in 2014 with very good results.
In this article I will explain what is the electronic visa to Russia (often abbreviated as e-visa), who can request it now and which steps have to be followed to obtain it. If you don’t meet the requirements to apply for an electronic visa, then you must apply for a paper visa by following the steps in this article: How to get the visa to Russia (in paper) easily and economically
1. SOME CONSIDERATIONS ABOUT THE ELECTRONIC VISA
1.1. What is the Russian e-visa?
The e-visa (or electronic visa) is an official document issued electronically by the consular department of the Ministry of Foreign Affairs of the Russian Federation, which allows entry to Russia. It is the alternative to a paper visa.
It is a visa that must be requested before arriving in Russia, that is, it is not a visa that is requested upon arrival at the airport in Russia.
The e-visa has two major advantages over paper visas:
- You can obtain it electronically, in an easy manner from your home through the website enabled by the Consular Department of the Ministry of Foreign Affairs of the Russian Federation: https://evisa.kdmid.ru/. Therefore, it is not necessary to travel to any Consulate or Russian visa center to carry out the procedure.
- The required documentation is very small, only a digital photo, travel medical insurance and passport. Therefore, it is not necessary to provide an invitation, hotel reservations, plane tickets or other documents that justify the purpose of your trip.
1.2. How much does the Russian e-visa cost?
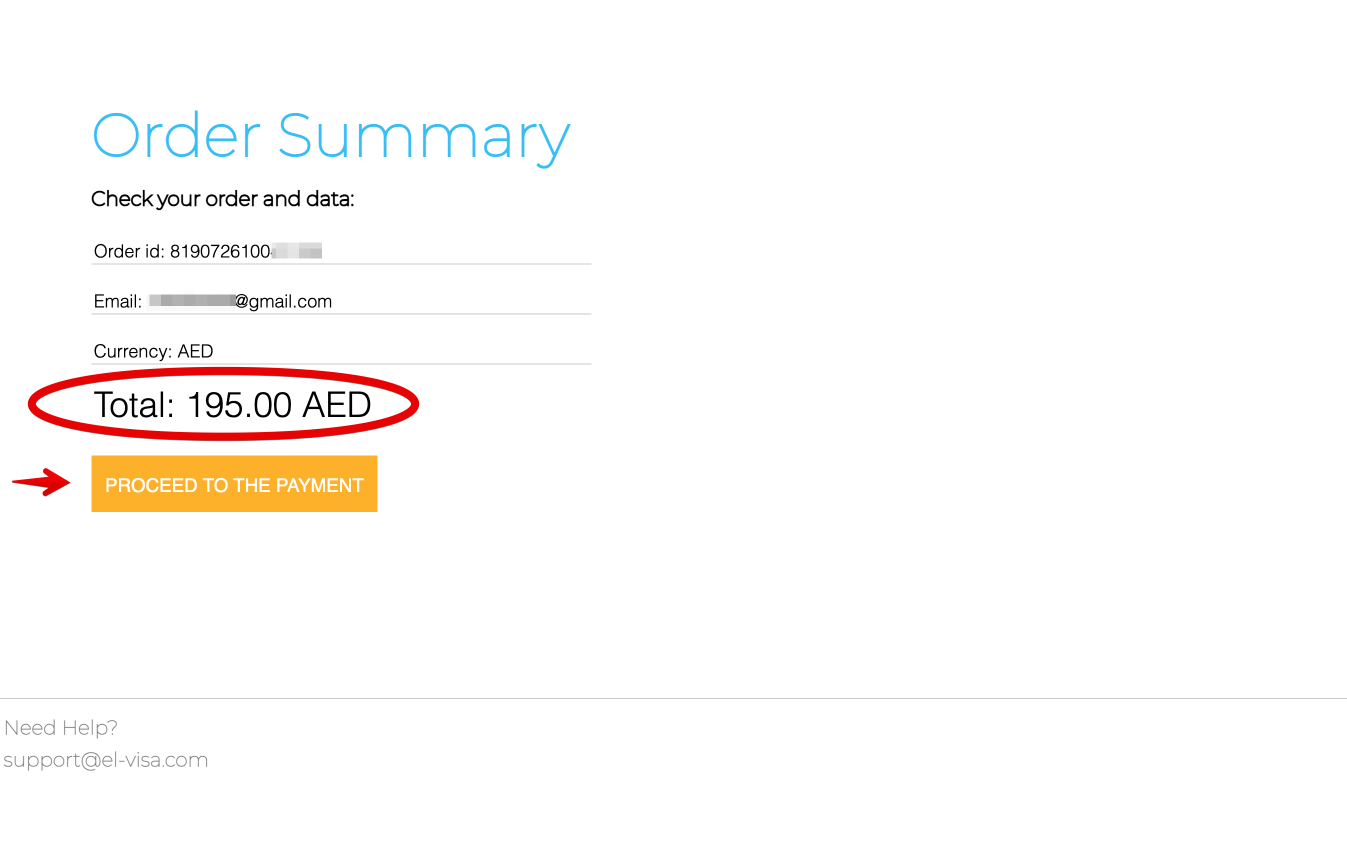
As of August 1, 2023, the electronic visa costs 54 dollars, in concept of consular fees, although the Russian Government has implemented a platform where payment is made with Chinese yuan (CNY) or United Arab Emirates dirhams (AED).
Children under the age of six by the date of the submission of the application are exempt from the consular fee.
1.3. Which e-visa categories exist?
The Russian evisa can only be from one of the following categories:
- The common tourist visa, when the purpose of the trip is tourism.
- An ordinary business visa, when the purpose of the trip is business.
- Visa for participating in scientific, cultural, socio-political, economic, sporting events and carrying out relevant communications and contacts.
If the purpose of your trip to the Russian Federation does not correspond to any of the above, then you must apply for a traditional visa (not electronic) in a diplomatic mission or consular office of the Russian Federation. For example, if you need a study or work visa, then you must apply for a regular or traditional visa.
1.4. What nationalities can apply for the e-visa to Russia?
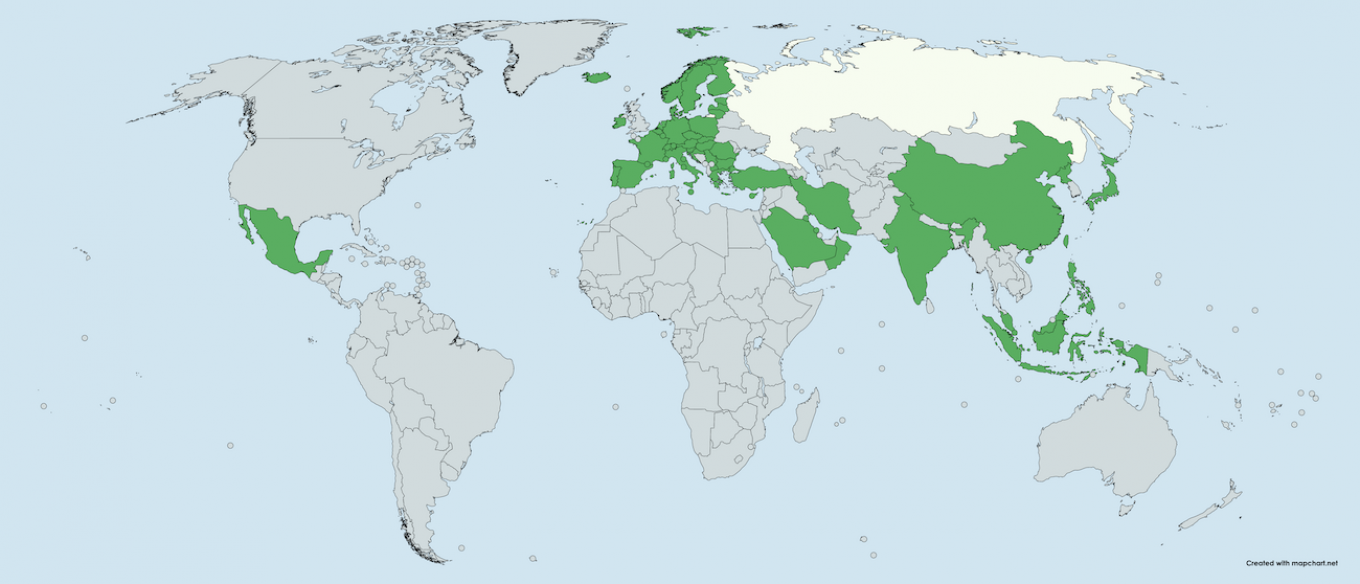
Currently, only nationals of the following 55 countries can apply for an electronic visa:
- Andorra
- Austria
- Bahrain
- Belgium
- Bulgaria
- Cambodia
- China
- Croatia
- Cyprus
- Czech Republic
- Democratic People’s Republic of Korea (North Korea)
- Denmark
- Estonia
- Finland
- France
- Germany
- Greece
- Hungary
- Iceland
- India
- Indonesia
- Iran
- Ireland
- Italy
- Japan
- Kuwait
- Latvia
- Liechtenstein
- Lithuania
- Luxembourg
- Malaysia
- Malta
- Mexico
- Monaco
- Netherlands
- North Macedonia
- Norway
- Oman
- Philippines
- Poland
- Portugal
- Qatar
- Romania
- San Marino
- Saudi Arabia
- Serbia
- Singapore
- Slovakia
- Slovenia
- Spain
- Sweden
- Switzerland
- Taiwan. China
- Turkey
- Vatican
Citizens of the United States, Canada, United Kingdom, Australia or New Zealand cannot apply for a Russian electronic visa.
In this map you can see the countries that can apply for the electronic visa:
1.5. Which regions of Russia can be visited with the e-visa?
Before 2021, the electronic visa only allowed to visit some Russian regions (Kaliningrad, Saint Petersburg, etc.), but since August 1, 2023, the unified electronic visa allows to move freely throughout the territory of Russia, with the sole exception of visits to territories, organizations and facilities for which a special permit is required and which normally correspond to military or secret facilities.
However, to enter or leave Russia with this electronic visa, it must be done through one of the following border control points:
- Air checkpoints «Vladivostok (Knevichy Airport)», «Yuzhno-Sakhalinsk (Khomutovo Airport)», «Petropavlovsk-Kamchatsky (Yelizovo Airport)», «Khabarovsk (Novy Airport)», «Anadyr (Ugolny Airport)», «Kaliningrad (Khrabrovo)», «Ulan-Ude (Muhino)», «Chita (Kadala)», «Pulkovo», «Belgorod», «Volgograd (Gumrak)», «Ekaterinburg (Koltsovo)», «Kazan», «Krasnodar (Pashkovsky)», «Krasnoyarsk (Yemelyanovo)», «Moscow (Vnukovo)», «Moscow (Domodedovo)», «Moscow (Sheremetyevo)», «Nizhny Novgorod (Strigino)», «Novosibirsk (Tolmachevo)», «Rostov-on-Don (Platov)», «Samara (Kurumoch)», «Sochi», «Irkutsk», «Chelyabinsk (Balandino)», «Arkhangelsk (Talagi)», «Astrakhan (Narimanovo)», «Bryansk», «Vladikavkaz (Beslan)», «Grozny (North)», «Zhukovskiy», «Kaluga (Grabtsevo)», «Lipetsk», «Makhachkala (Uytash)», «Mineralnye Vody», «Murmansk», «Nalchik», «Saratov (Gagarin)», «Syktyvkar», «Tomsk (Bogashevo)», «Yaroslavl (Tunoshna)», «Abakan», «Barnaul», «Kemerovo», «Omsk (Tsentral’nyy)», «Orenburg (Tsentral’nyy)», «Perm (Bol’shoe Savino)», «Tyumen (Roshchino)», «Ulyanovsk (Vostochny)», «Ufa», «Cheboksary»;
- Naval checkpoints «Vladivostok», «Zarubino», «Posiet», «Korsakov», «Petropavlovsk-Kamchatsky», «Kaliningrad (checkpoints in the cities of Kaliningrad and Svetly)», «Vysotsk», «Big port Saint Petersburg (Marine Station, Fort Constantin, English Embankment and Lieutenant Schmidt Embankment)», «Passenger port Saint Petersburg», «Sochi (International Center for Sea Passenger and Cruise Transportation)», «Magadan», «Nikolayevsk-on-Amur»;
- Railroad checkpoints «Pogranichny», «Khasan», «Makhalino», «Mamonovo», «Sovetsk», «Saint Petersburg – Finlyandskiy», «Zabaikal’sk», «Naushki»;
- Automobile checkpoints «Poltavka», «Turiy Rog», «Bagrationovsk», «Gusev», «Mamonovo (Grzechotki)», «Mamonovo (Gronowo)», «Morskoje», «Pogranichny», «Sovetsk», «Chernyshevskoye», «Ivangorod», «Torfjanovka», «Brusnitchnoe», «Svetogorsk», «Kyakhta», «Ubylinka», «Burachki», «Vyartsilya», «Kunichina Gora», «Shumilkino», «Verkhny Lars», «Lyuttya», «Solov’evsk», «Starotsurukhaitui»;
- Pedestrian checkpoint «Ivangorod»;
- River checkpoint «Khabarovsk»;
- Mixed checkpoints «Blagoveshchensk», «Amurzet», «Pokrovka».
In summary:
- By plane, you can enter through the main Russian airports, including those in Moscow and Saint Petersburg, which are where most travelers enter.
- By train, you can enter from Finland, China, Mongolia, North Korea, Lithuania/Poland (to Kaliningrad)…
- By car you can access from Finland, Estonia, Latvia… (or also from Lithuania or Poland but only to the Russian region of Kaliningrad).
- By boat or cruise you can enter through the ports of Saint Petersburg, Vladivostok, Zarubino, Sochi, etc.
- You can only go on foot from Estonia (Ivangorod).
In this map you can see some of the main entry and exit points according to type of transport:
1.6. Should I enter and exit through the same checkpoint?
With e-visa you can enter through one of the authorized control points and exit through a different authorized point. For example, you can enter through Pulkovo Airport and exit through one of the Moscow airports (or vice versa).
Border control points are points equipped with the latest technology to control electronic visa. Therefore, new control points will be added over time.
1.7. Which is the duration of the e-visa?
The e-visa is issued for a single entry and for a duration of up to 60 days from the date of issue, however, the maximum stay allowed in Russia is 16 days from the date of entry and within its period of validity.
Also keep in mind that the validity of the e-visa can’t be extended, except in cases where it is impossible to leave the territory of the Russian Federation due to the need of emergency treatment or unsurmountable circumstances (force majeure) or pandemics or natural disasters.
The above explanation may seem a bit confusing at first glance, but with an example you can see it more clearly:
- In the first place, it must be clear that 16 days does not mean that one can stay for the full 384 hours (24 hours for 16 days), since permanence in the Russian Federation always begins at midnight on the day of the passport control, when crossing the border, regardless of the actual time of passage through passport control.
- For example, if you have a valid electronic visa from July 15 to September 13 (60 days), and you enter Russia through passport control at 8:00 p.m. on August 1, in that case, you must leave the country for passport control before 11:59 p.m. on August 16 (instead of until 8:00 p.m. on August 17).
- You should also consider that if you cross passport control to enter Russia, for example, on September 1, with the electronic visa from the previous example (remember that it was valid from July 15 to September 13), then you must leave Russia by crossing passport control before 11:59 pm, on September 13.
1.8. When can the e-visa be requested?
You can complete the electronic visa application form at the earliest 40 days before the scheduled date of your trip and no later than 4 days before the expected date of entry into the Russian Federation. For example, if you want to enter Russia on July 30, you can begin the e-visa application procedure on June 20.
1.9. How long does it take to issue the e-visa?
The electronic visa is issued within a maximum period of 4 days from the date of the request, though it is usually ready in less days.
1.10. Where is the e-visa requested?
You can request the electronic visa in three ways:
- Yourself from your home computer, through the address: https://evisa.kdmid.ru/
- Entrust it to a visa agency to be responsible for carrying out the procedure.
1.11. Am I required to stay in the hotels or apartments that I have included in the electronic visa application?
You are not obligated, you can change your accommodation when you arrive in Russia. In fact, a hotel reservation is not necessary to request an electronic visa. You can include any hotel.
1.12. Can I stay in apartments or private houses of friends or family?
Yes, simply choose “Individual” type of accommodation, and include host information, address and telephone number.
1.13. What if I travel with minors?
If you travel with your minor children, you must submit a separate electronic visa application for each child. All minor children traveling with their parents must have their own electronic visa.
However, children under the age of six on the application submission date are exempt from the consular fee.
1.14. Is it mandatory to apply for an electronic visa if I already have a traditional visa?
It is not necessary to apply for an electronic visa to enter Russia, if you already have a regular or traditional visa in your passport.
An electronic visa does not extend the validity period of a regular visa.
1.15. In which cases can I not apply for the e-visa and must I apply for a regular or traditional visa?
You must apply for a regular or standard visa in the following cases:
- If you are not a citizen of any of the 55 countries that can apply for an electronic visa. For example, citizens of the United States, Canada, United Kingdom, Australia or New Zealand cannot apply for a Russian electronic visa.
- If you want to stay in Russia more than 16 days,
- If your electronic visa is denied,
- If in 4 days you have not received any notification after your e-visa application
- If the type of visa you want to apply for is neither for tourism, nor business nor any of the types of electronic visas allowed. Therefore, if you need a work or study visa, then you must apply for a regular paper visa.
- If you can’t pay for the electronic visa because your cards fail when paying with Chinese Yuan or United Arab Emirates Dirhams. In any case, foreign Visa, MasterCard and JCB cards are accepted.
2. STEPS TO OBTAIN ELECTRONIC VISA OR AN E-VISA TO RUSSIA
To apply for the electronic visa, you will only need:
- To have a valid passport at least 6 months from the date of application for the e-visa, and with free space for the stamps that will be placed at the border crossing.
- To fill out a simple electronic form with your personal information, your work information, cities you will visit and places where you will stay.
- A recent digital photo, which you must attach during the application. You can take it with the front camera of your mobile phone, with a plain wall of light color in the background.
- Travel medical insurance with coverage in the Russian Federation during the period of your trip. Below I explain how to get valid insurance in electronic format in 5 minutes.
The best: it is not necessary to provide an invitation, hotel reservations, airline tickets, a scanned passport or any other document that justifies the reason for the trip, nor is it necessary to travel to the consulate or the Russian visa center to complete the process. You only need a computer with an Internet connection.
Important: when filling in the form, make sure that all the information is correct and that the information in your passport matches the information included in the application. The e-visa is issued with the information you provide during the electronic application process, so if there is information in your electronic visa application that does not match your passport, they could deny you entry at the border. Also, don’t include a false photo, since they will be check it at the border.
STEP 1. Have a valid passport

The first thing you will need to be able to apply for the e-visa is your passport, which must be valid for at least 6 months from the date you request the visa. That is, if you apply for the visa on July 1, 2024, then your passport must be valid beyond December 31, 2024.
In the e-visa application you will be asked for the information of your passport: passport number, date of issue, validity date, etc.
You will need to scan or photograph the passport page with your personal data to attach it during the visa application process.
When you cross the border in Russia, they will ask for your passport and they will verify that its information contained there matches with what you declared in the application.
Please note also that the passport must not present any damage, scratch or be unstitched. If this is the case, it’s better that you renew it before requesting the electronic visa.
STEP 2. Take a digital photo
Before starting to fill out the electronic visa form, you must have a digital photo of 3.5 cm x 4.5 cm, which must be recent and on a white background.
You can even take a photo yourself at home with the front camera of your mobile. Just stand in front of a plain light-colored wall and take a photo with your head held high.
The digital photographs must meet with these specifications:
STEP 3. Acquire travel insurance
In order to enter Russia, in addition to a visa, it is necessary to have travel medical insurance with coverage in Russia and that covers your entire period of stay in Russia.
Travel medical insurance must be purchased before traveling. It is not possible to buy it when arriving in Russia, neither at the airport nor at any border entry point. In addition, the policy must come in Russian or English, it must cover the entire period of your trip and it must specify that it has coverage in Russia or worldwide.
Travel insurance can be purchased online, although you must print the policy to present it along with your electronic visa.
In addition, in the visa application form, you must indicate the insurance company and the policy number.
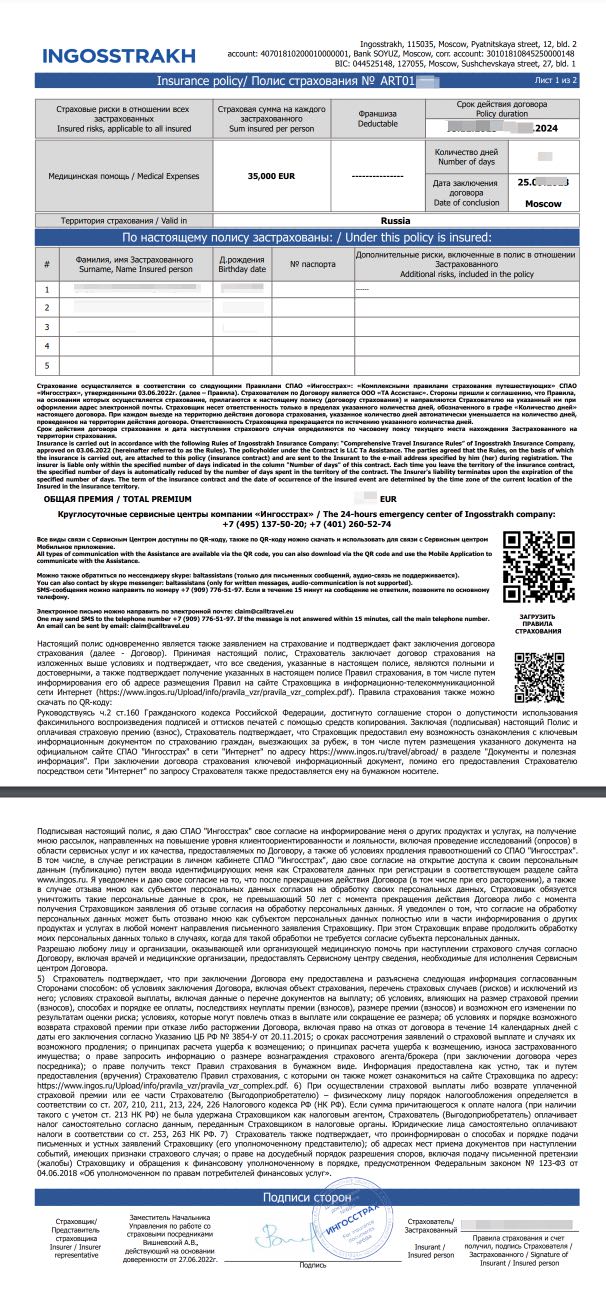
A quick and inexpensive way to obtain travel medical insurance online is through the Russian company Attollo Assistance, through which you can get an 10-day travel insurance with coverage in Russia for 16 euros:

STEP 4. Fill in the electronic form and get the unified e-visa
Now that you have a valid passport, travel insurance and a digital photo, it is time to complete the electronic visa application form.
Some prior matters to consider:
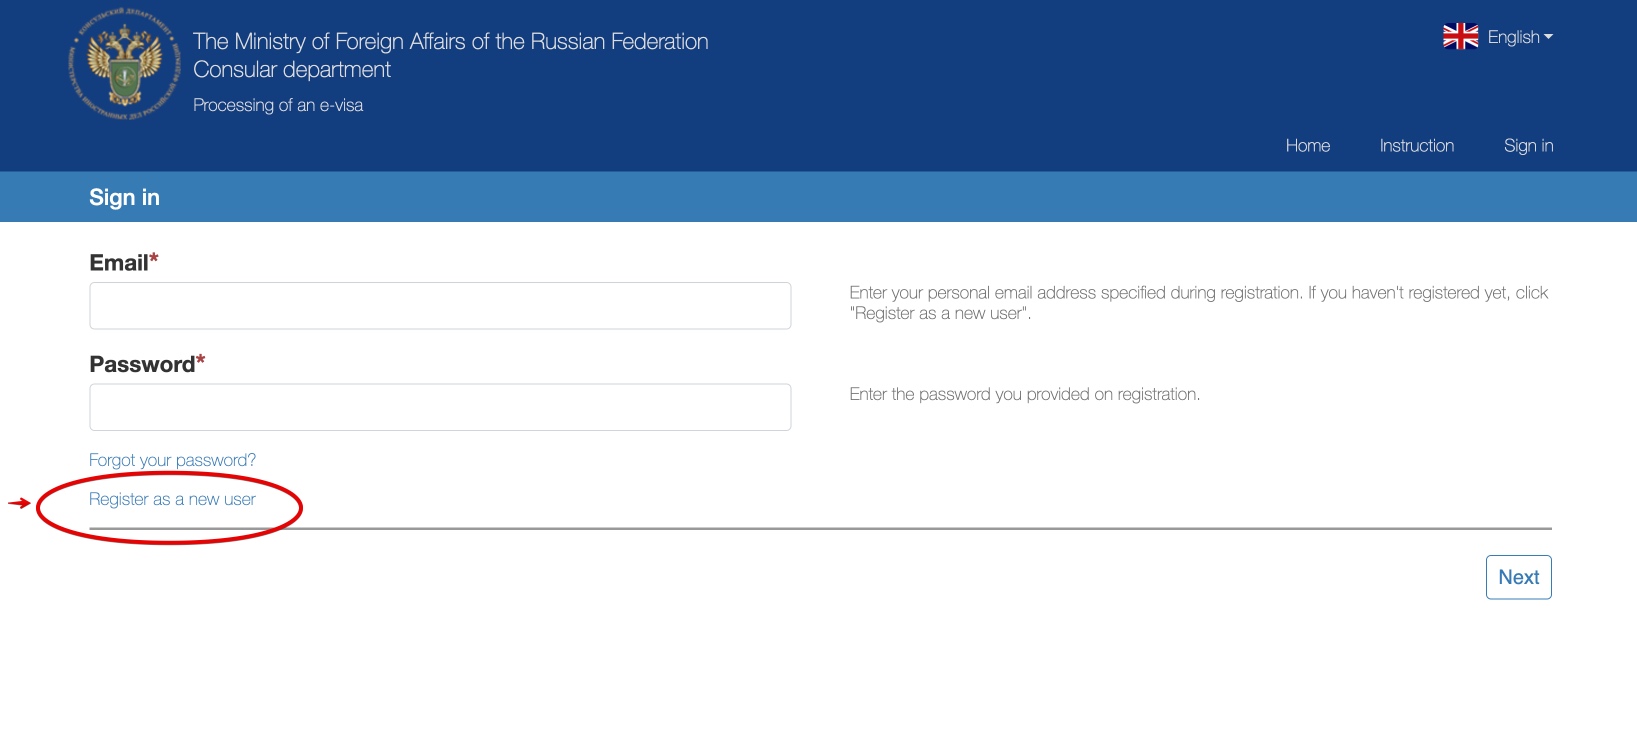
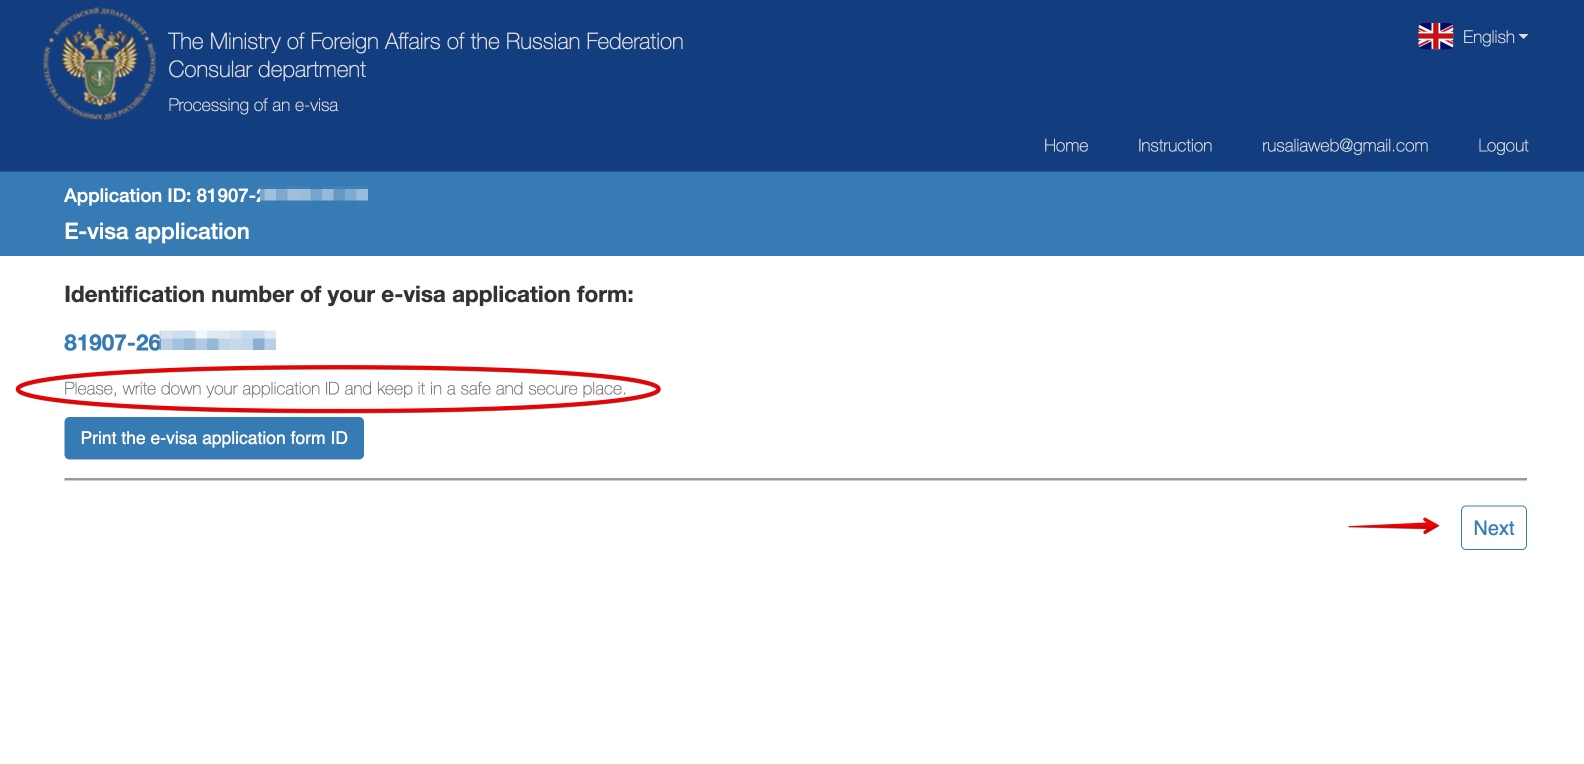
- You must register as a new user.
- You can start filling in the electronic visa today and finish it another day. Of course, you must save it with the “Save the draft” button. You should also bear in mind that the unfinished forms are saved on the server for a maximum period of 30 days from the last time you saved it.
- Fields with an asterisk must be completed.
- If your minor children accompany you, you must also fill out an electronic form for each one of them. All minors who are accompanied by their parents must also have an individual e-visa.
I show you below how to fill out the e-visa application form (first in video and then step by step with screenshots):
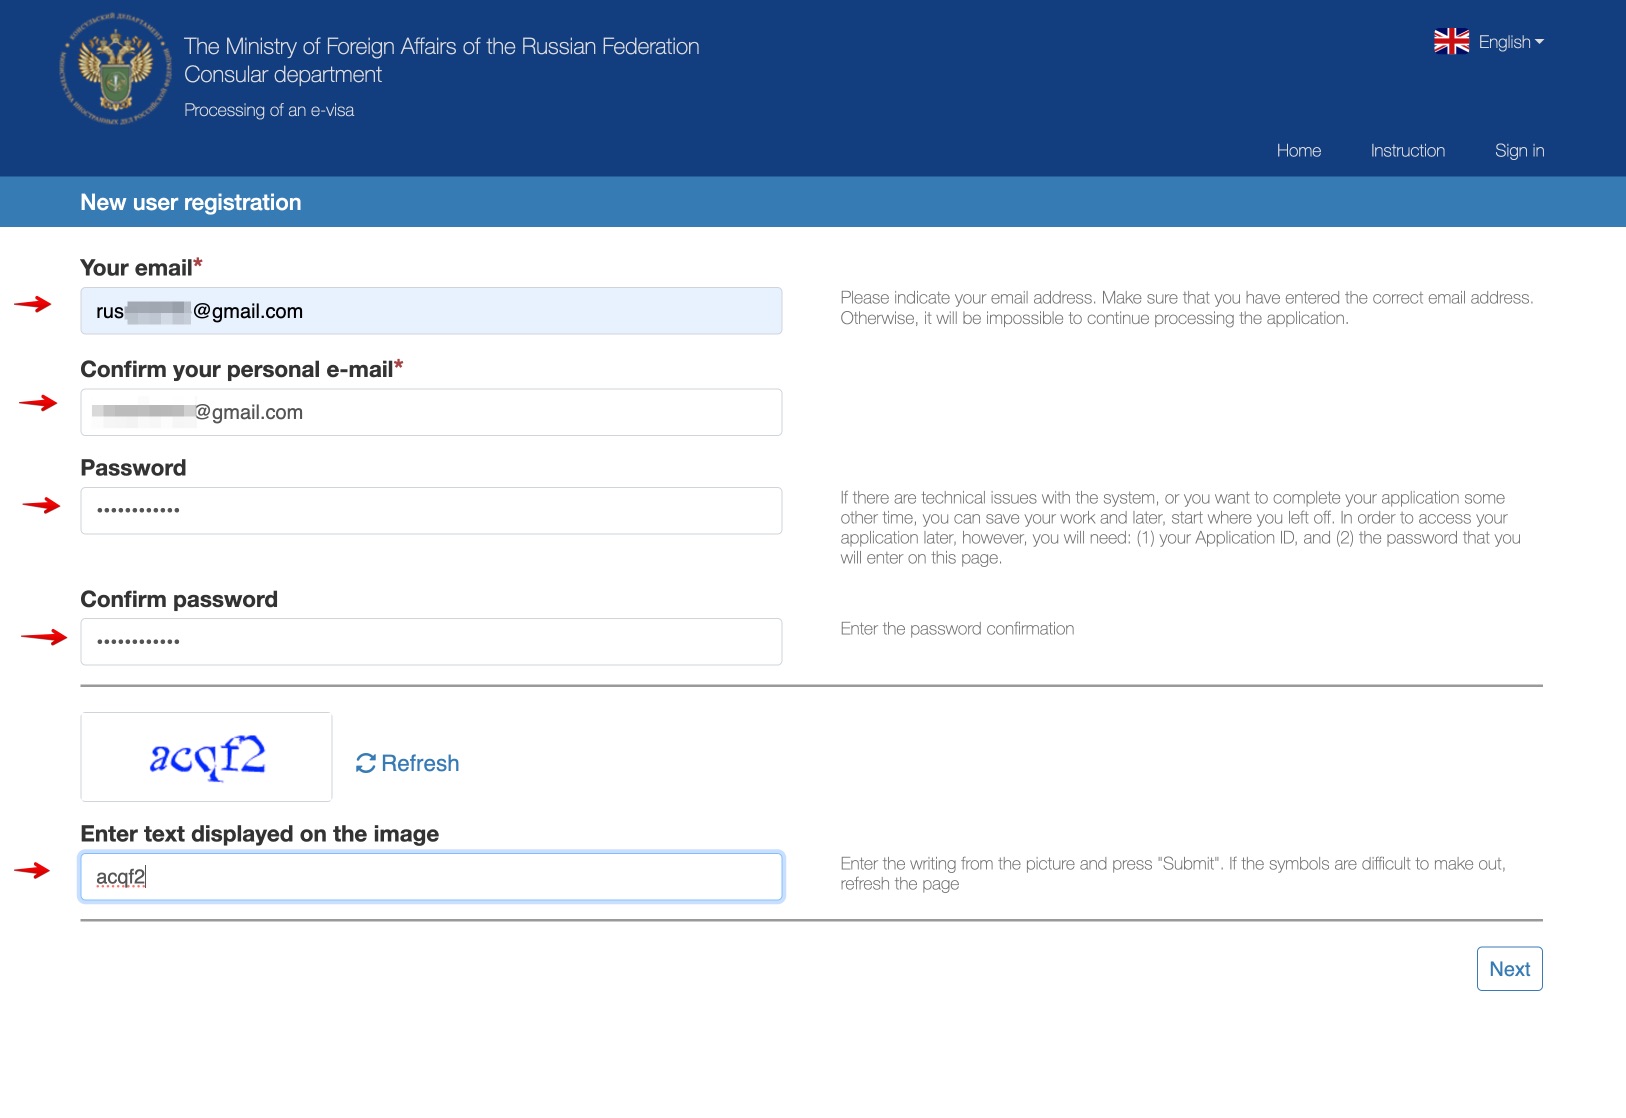
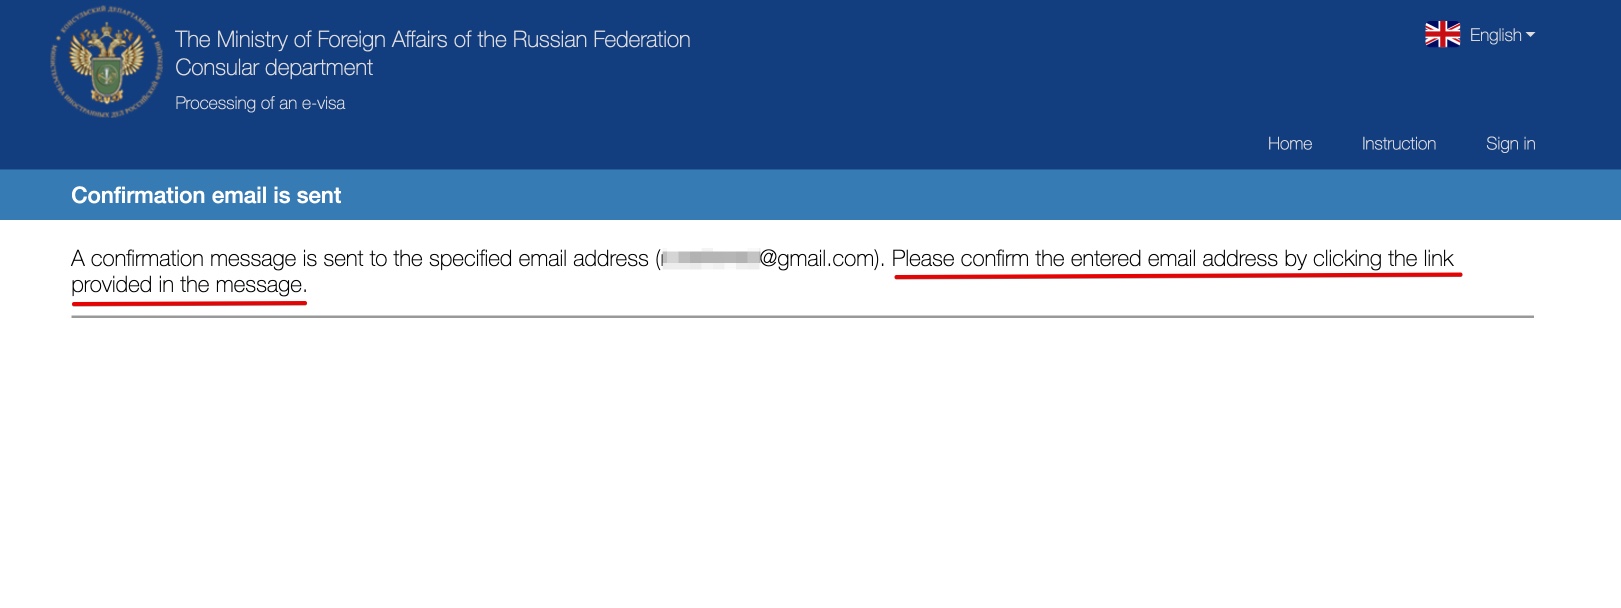
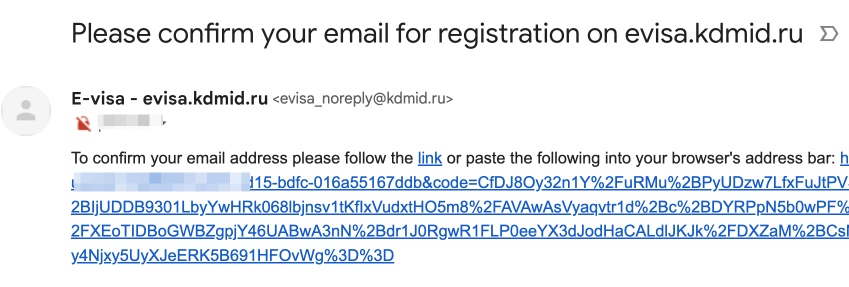
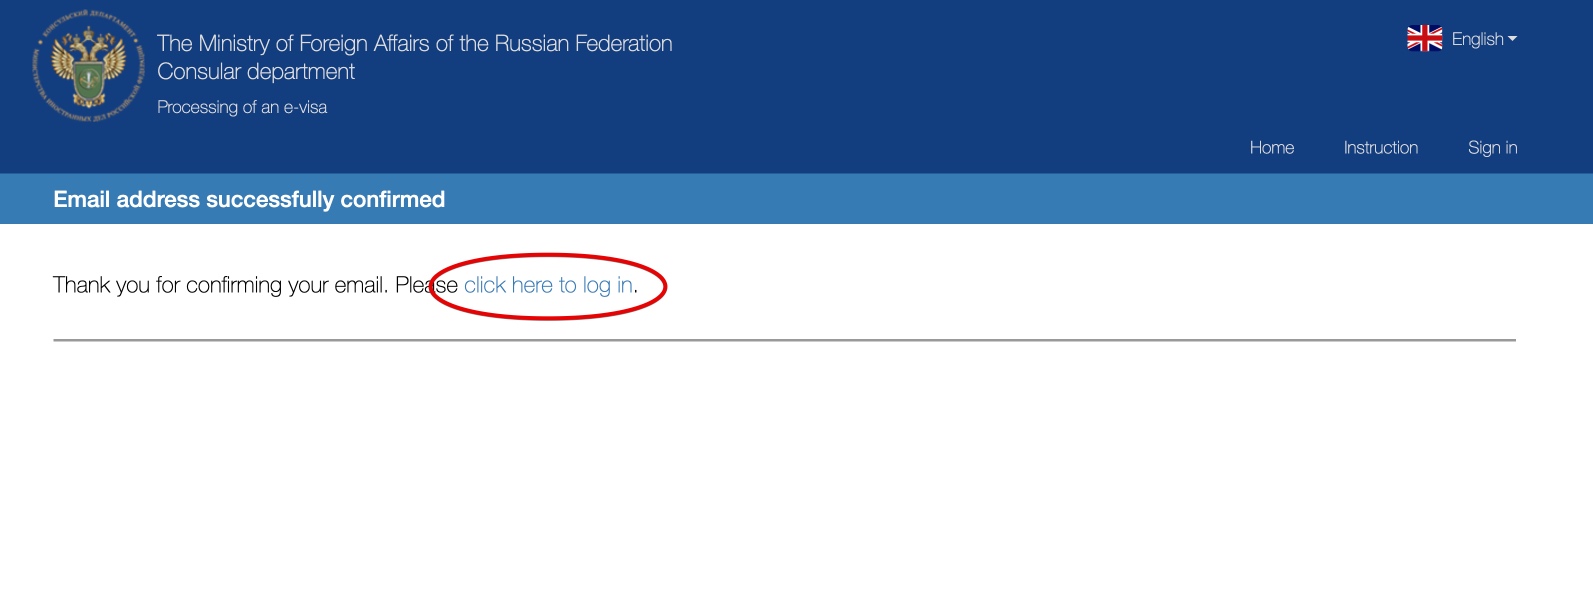
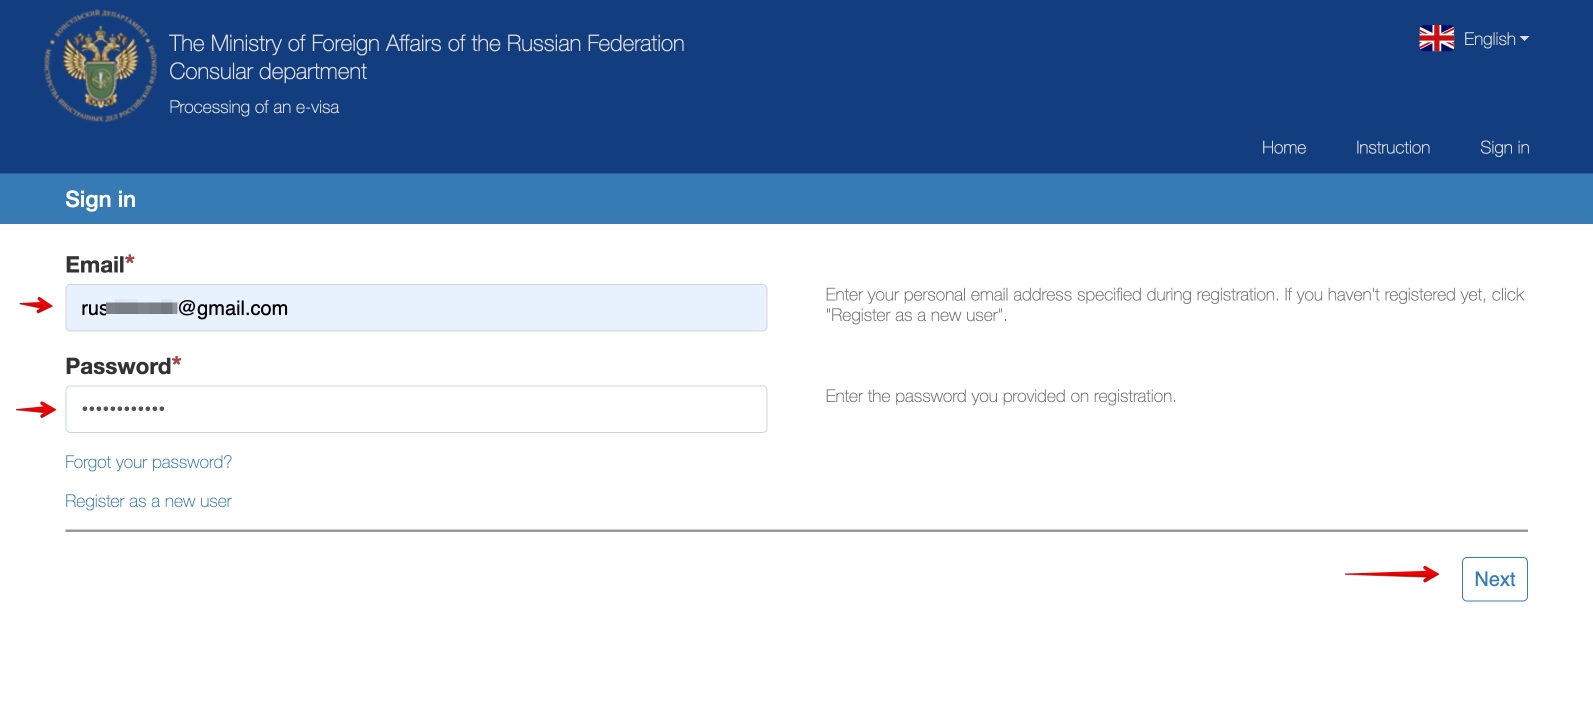
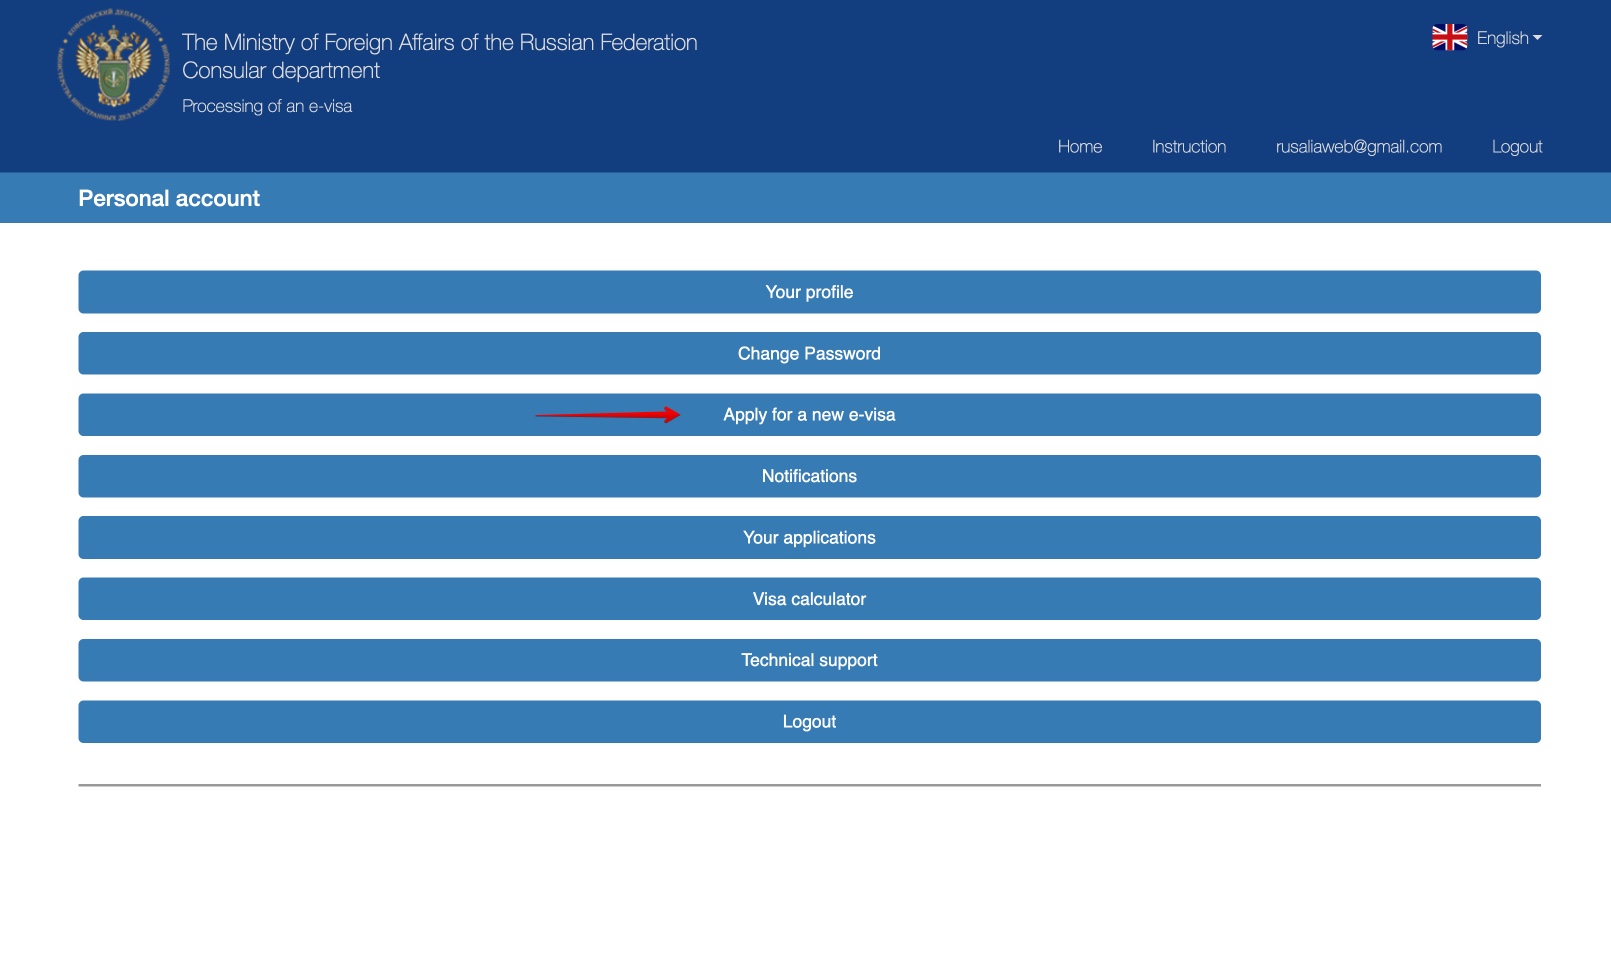
4.0. Register as new user
First of all, you must accept the terms of use, click the button to fill out a new form and register as a new user.

4.1. Photograph
You must take a photo, as explained in step 2 of this article and upload it to the form. Try to fit the photo in the center of the space dedicated to it.

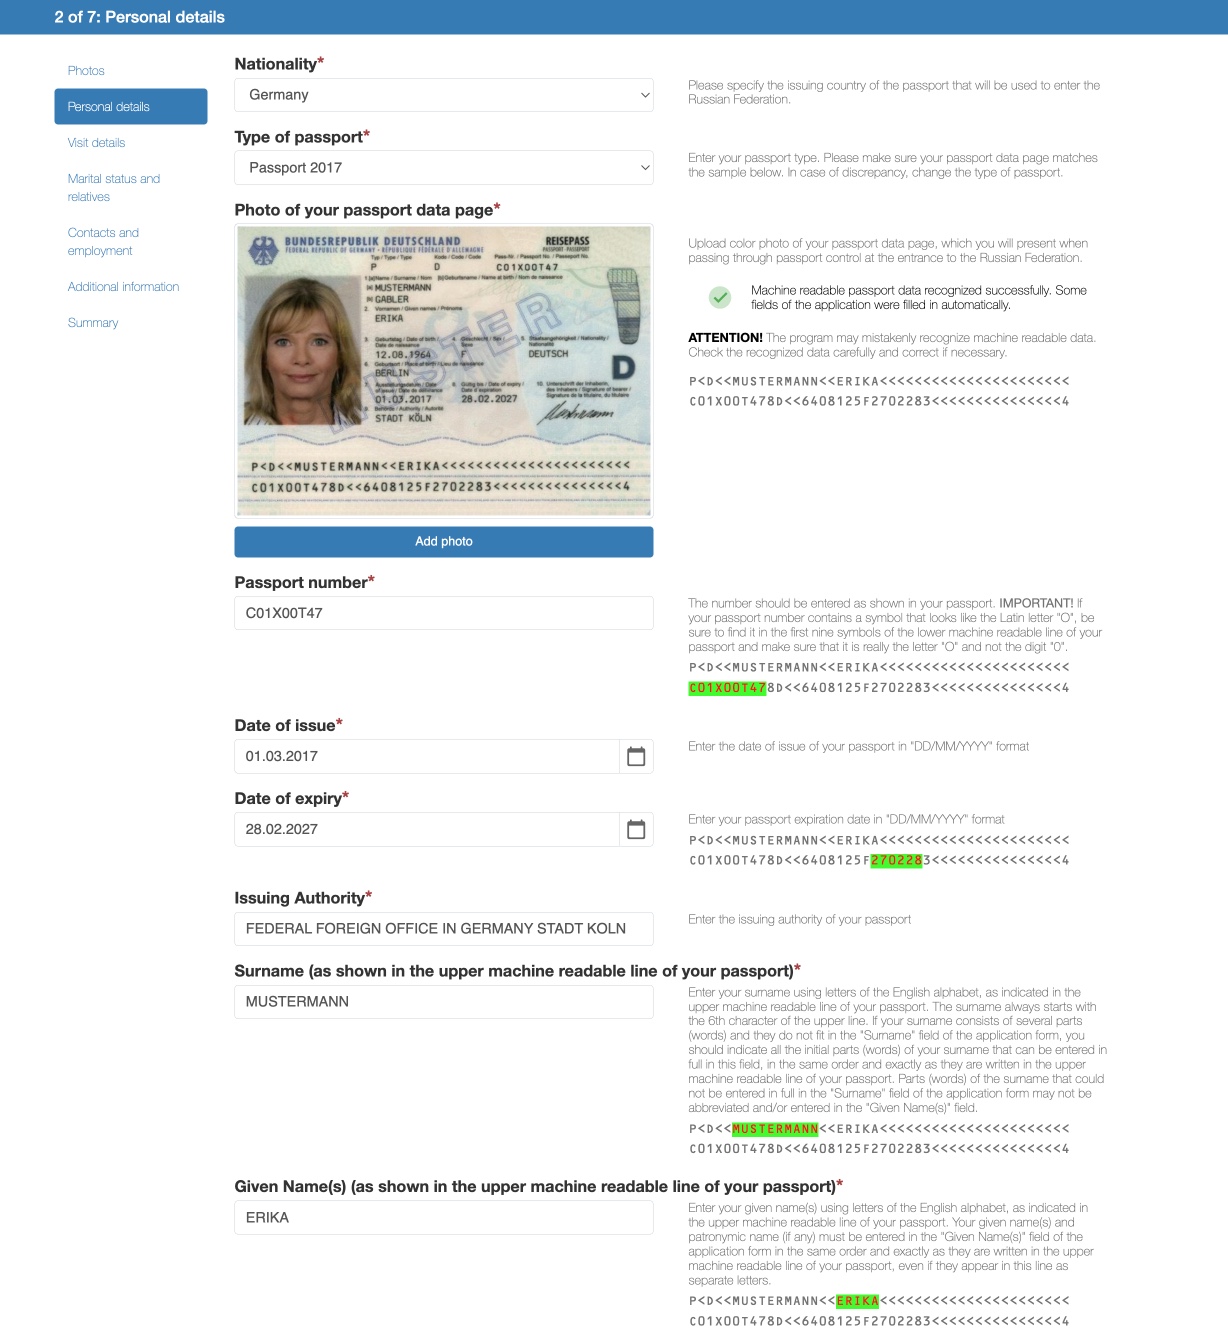
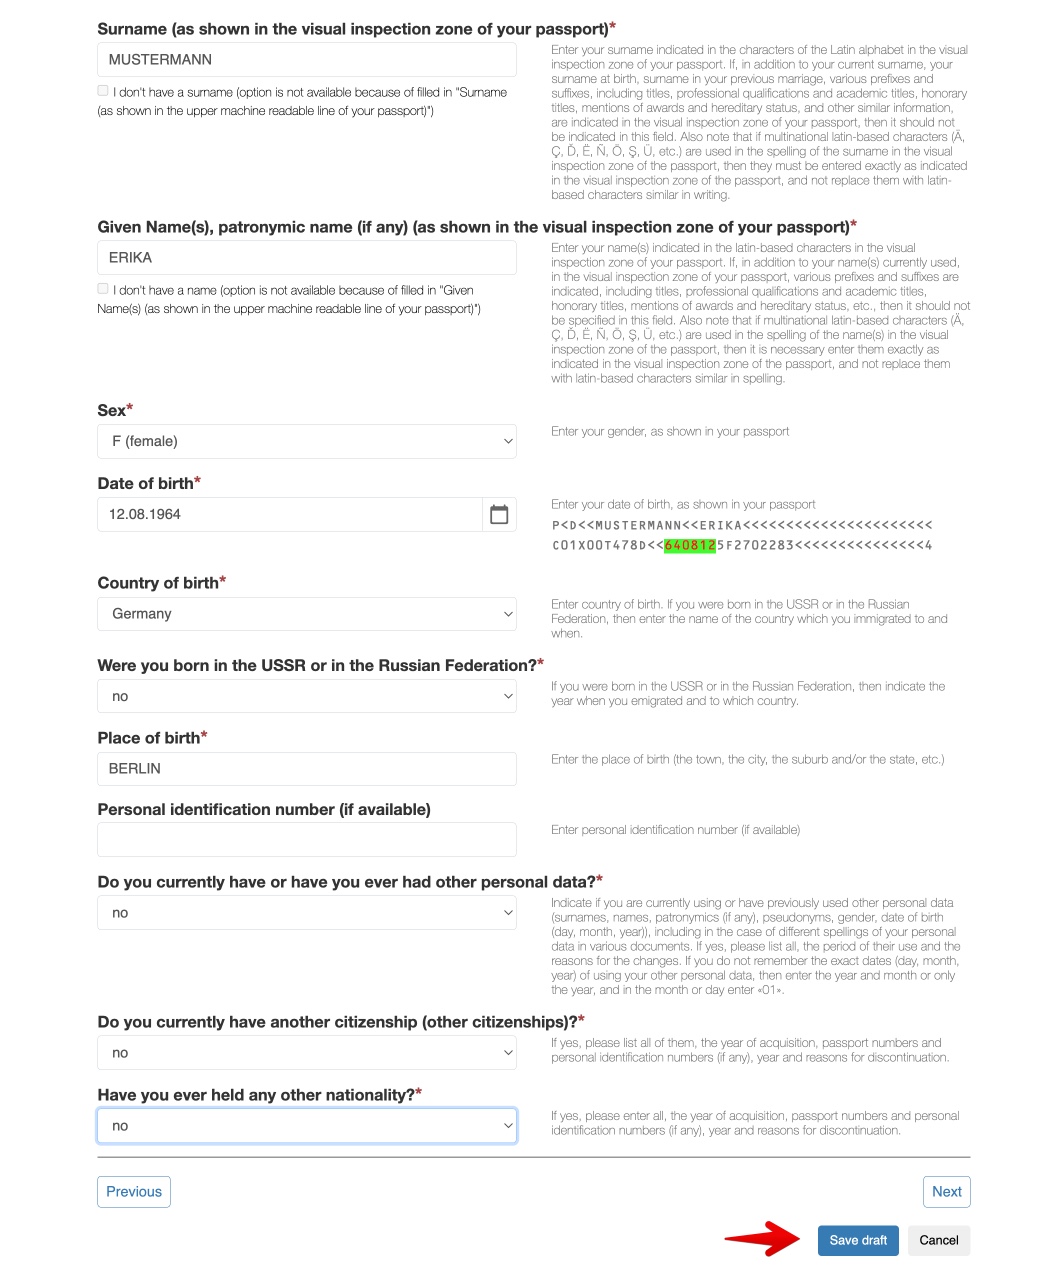
4.2. Personal data
You must upload a color photograph of your passport with your personal details. After uploading the photo, you can check how some of the fields in the form are filled in. Check that they are all completed. Otherwise, fill in the missing ones.
You must first fill in your name as they appear on the bottom of the passport (next to the sign <<<<<<) and then as they appear next to your photo (including any special characters you may have: Á, Ä, ç, Ë, ñ, ö, ş, ü, etc.).
4.3. Visa details
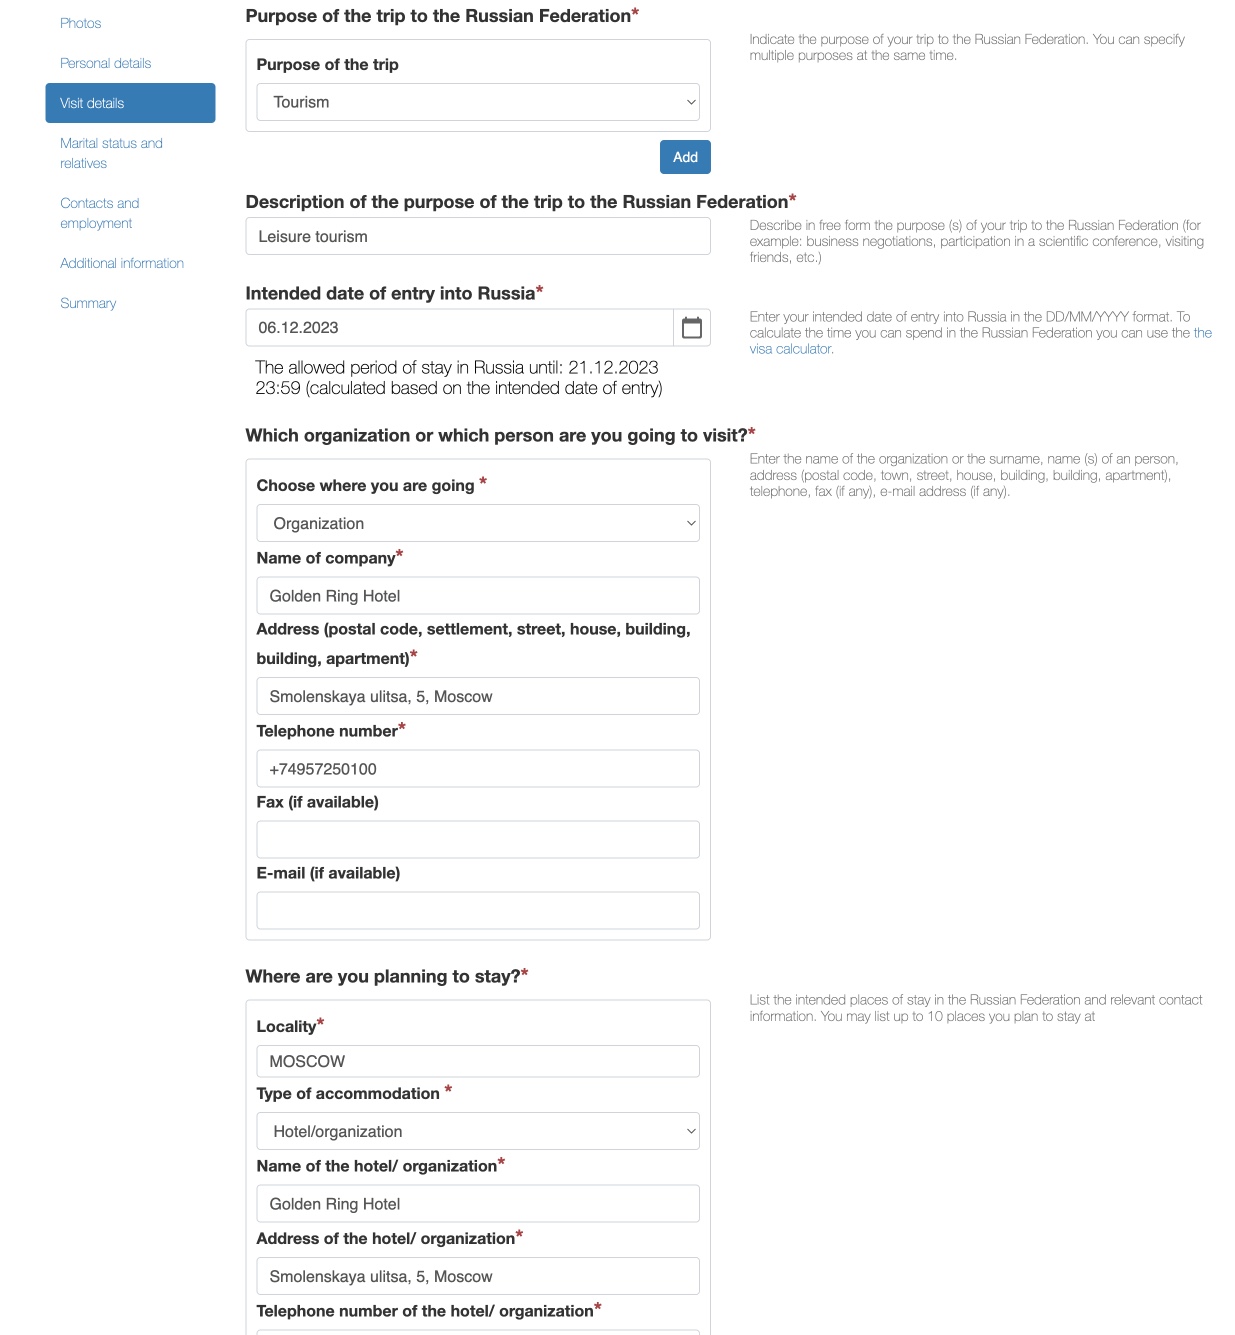
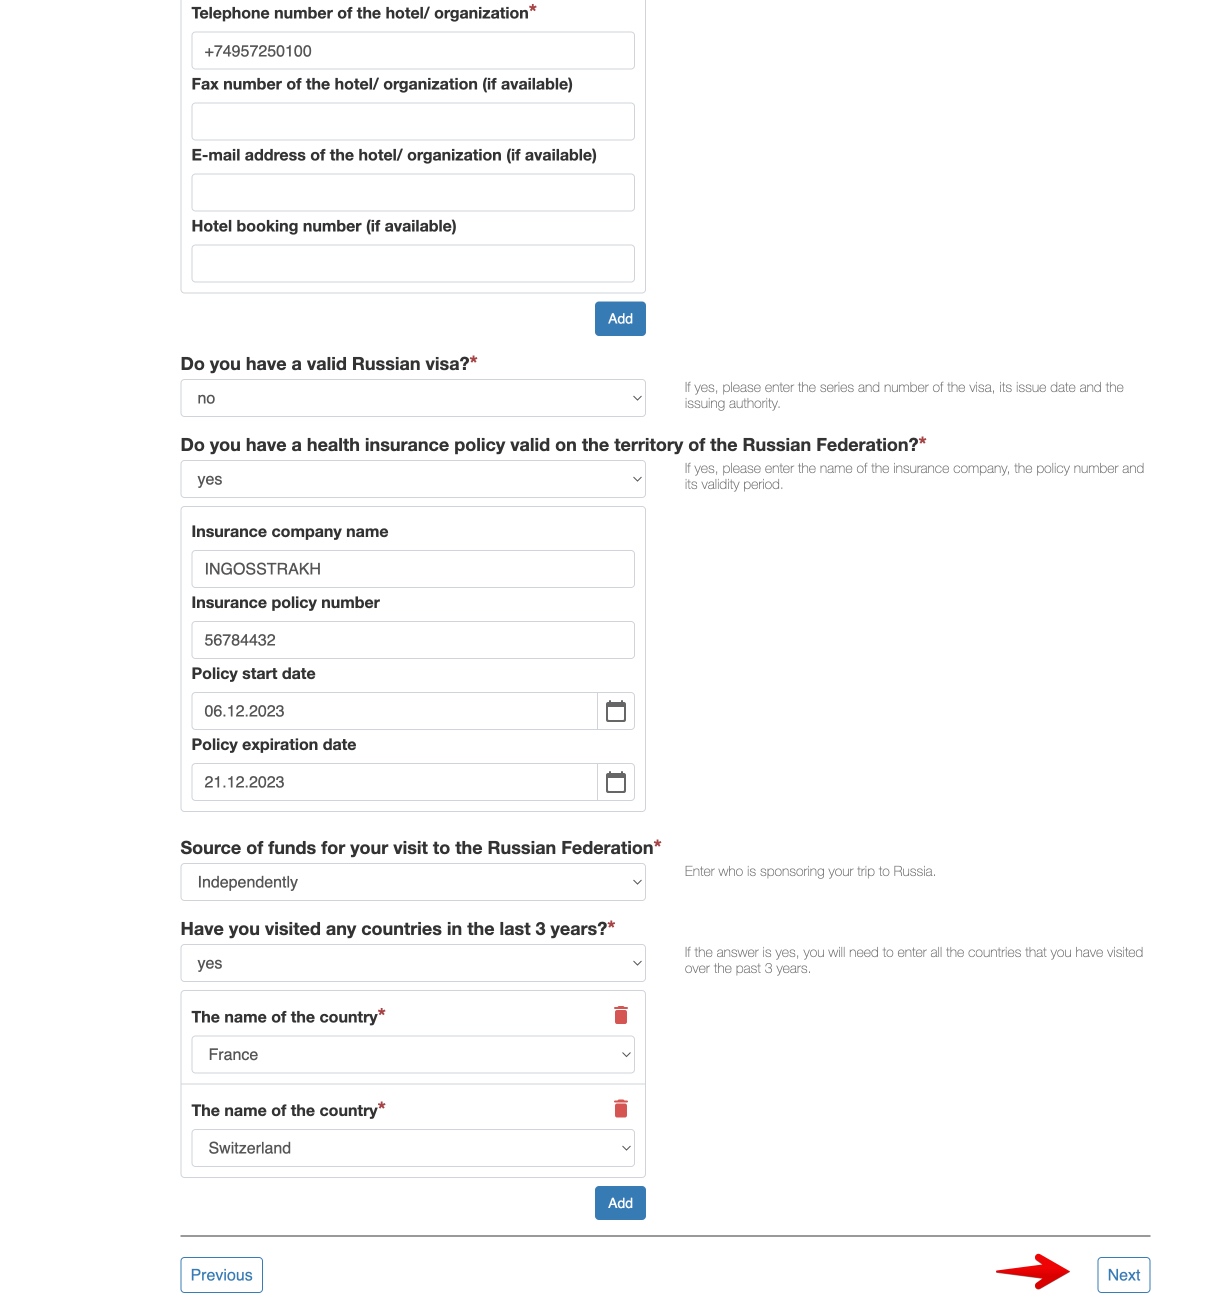
In this section you must specify the reason for your visit (tourism, business, cultural, sports, scientific-technical, etc.), the date you plan to enter in Russia and the information of your accommodations (Hotel, apartment or address of the private house or apartment in which you will be staying). Finally, you must also indicate if you have visited Russia before.
Regarding hotels or tourist apartments, nothing happens if you include a hotel and you end up staying in a different one. Reservation of accommodation is not necessary
Regarding the question “Which organization or which person are you going to visit?” choose “Organization” if you are staying in a hotel or tourist apartment or “Individual” if you are going to visit someone.
This question can be a bit confusing since then you are asked again about the place where you will be staying.
You must also enter your travel insurance details. You can get travel insurance at a good price with the Russian insurance company Attollo Assistance and pay with any card (foreign or Russian).
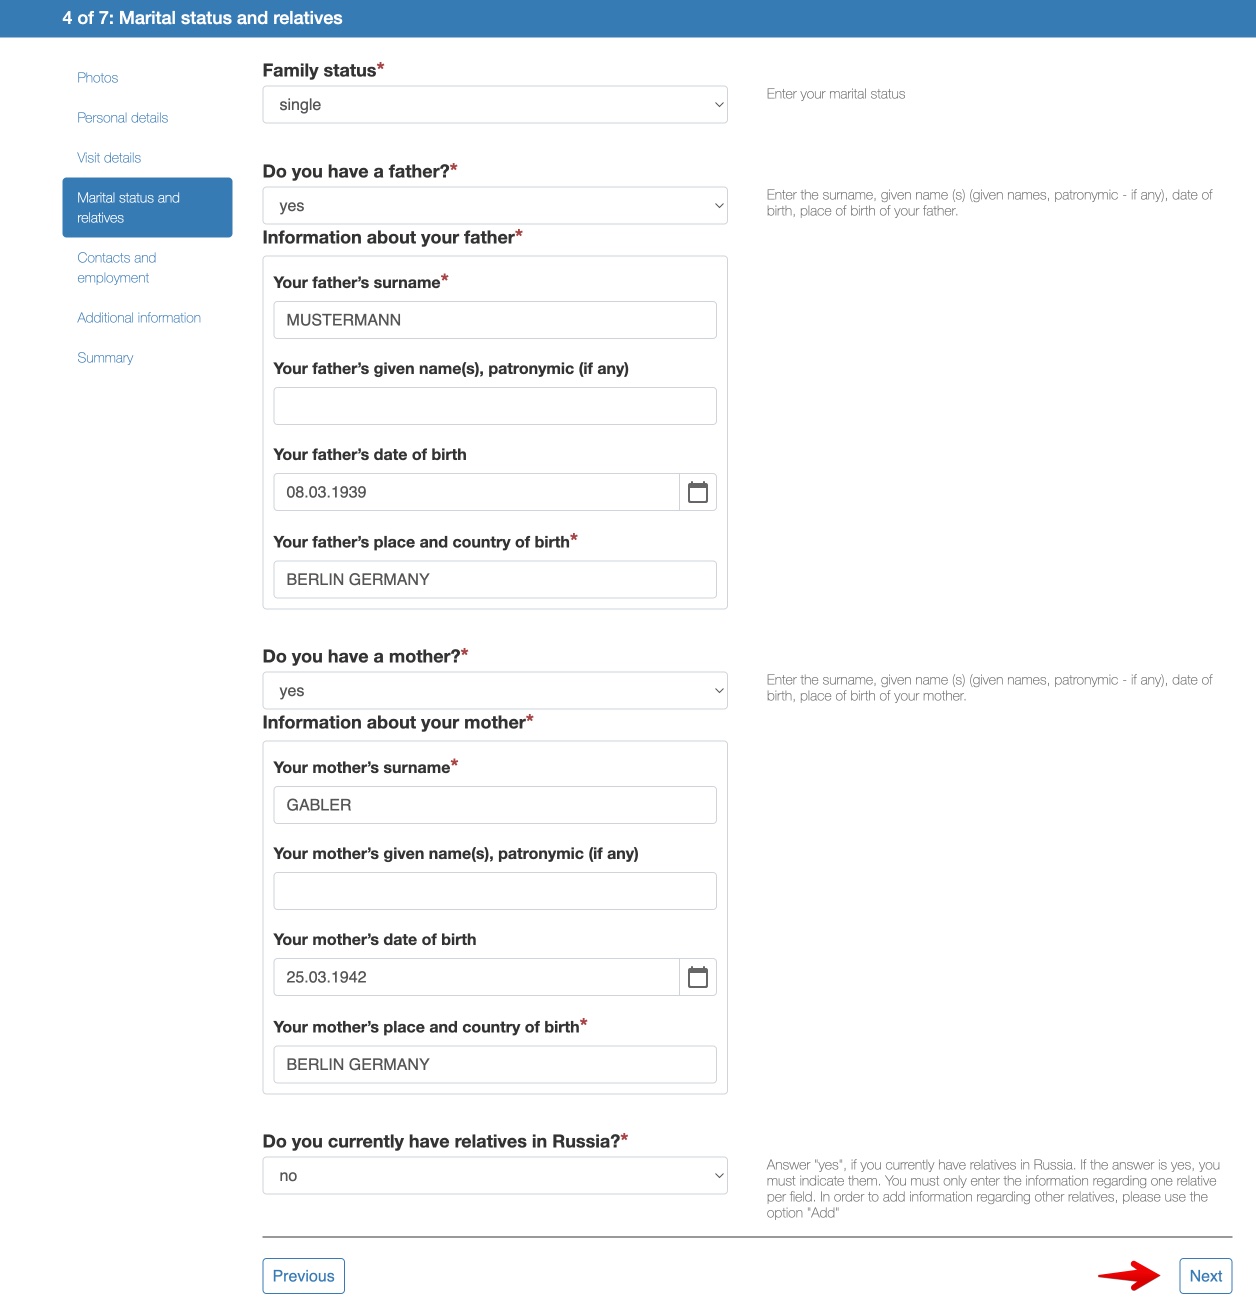
4.4. Marital status and family
Here you must indicate your marital status, personal details of your parents and, if applicable, any relatives you have in Russia.
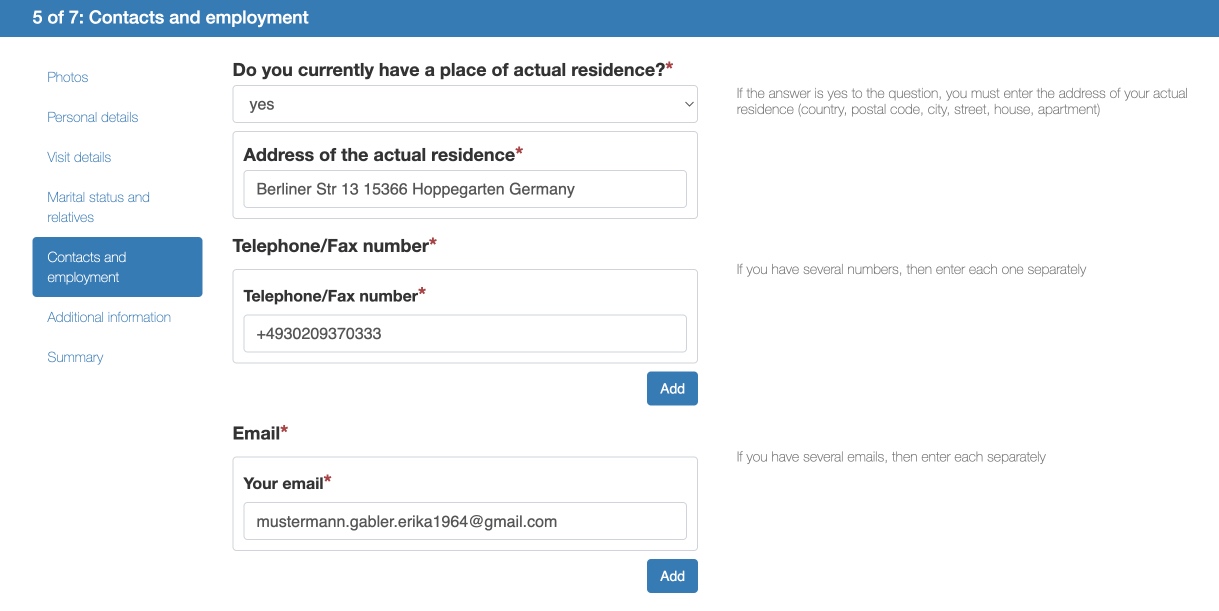
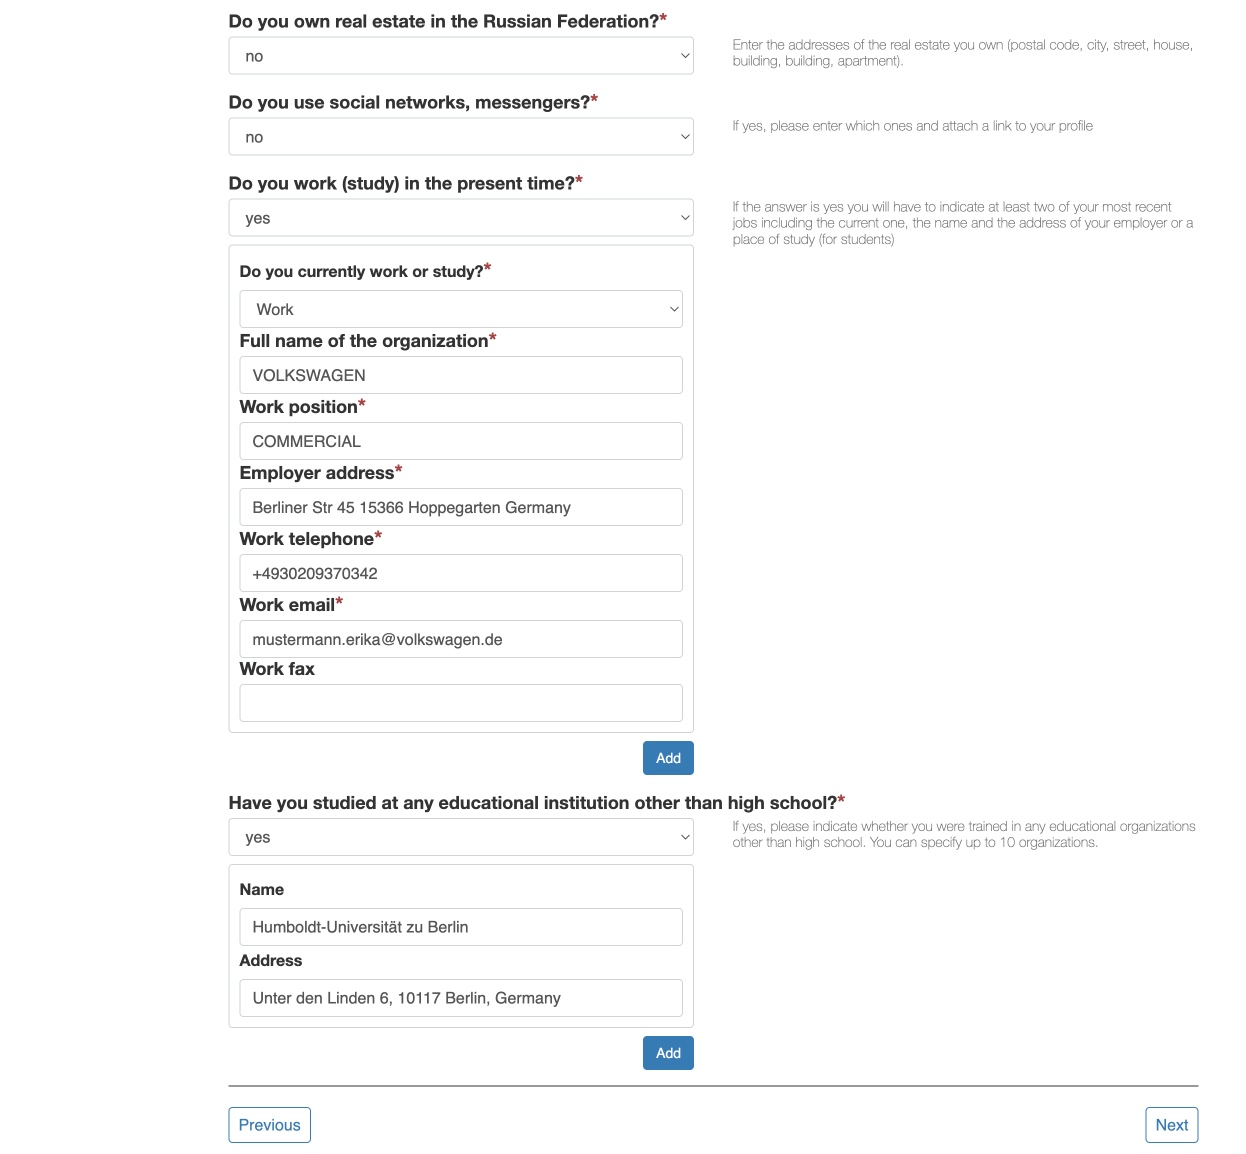
4.5. Contact and work details
You must indicate your permanent residence details, your email address, as well as your work details. You must also indicate if you have studied at any educational institution other than high school.
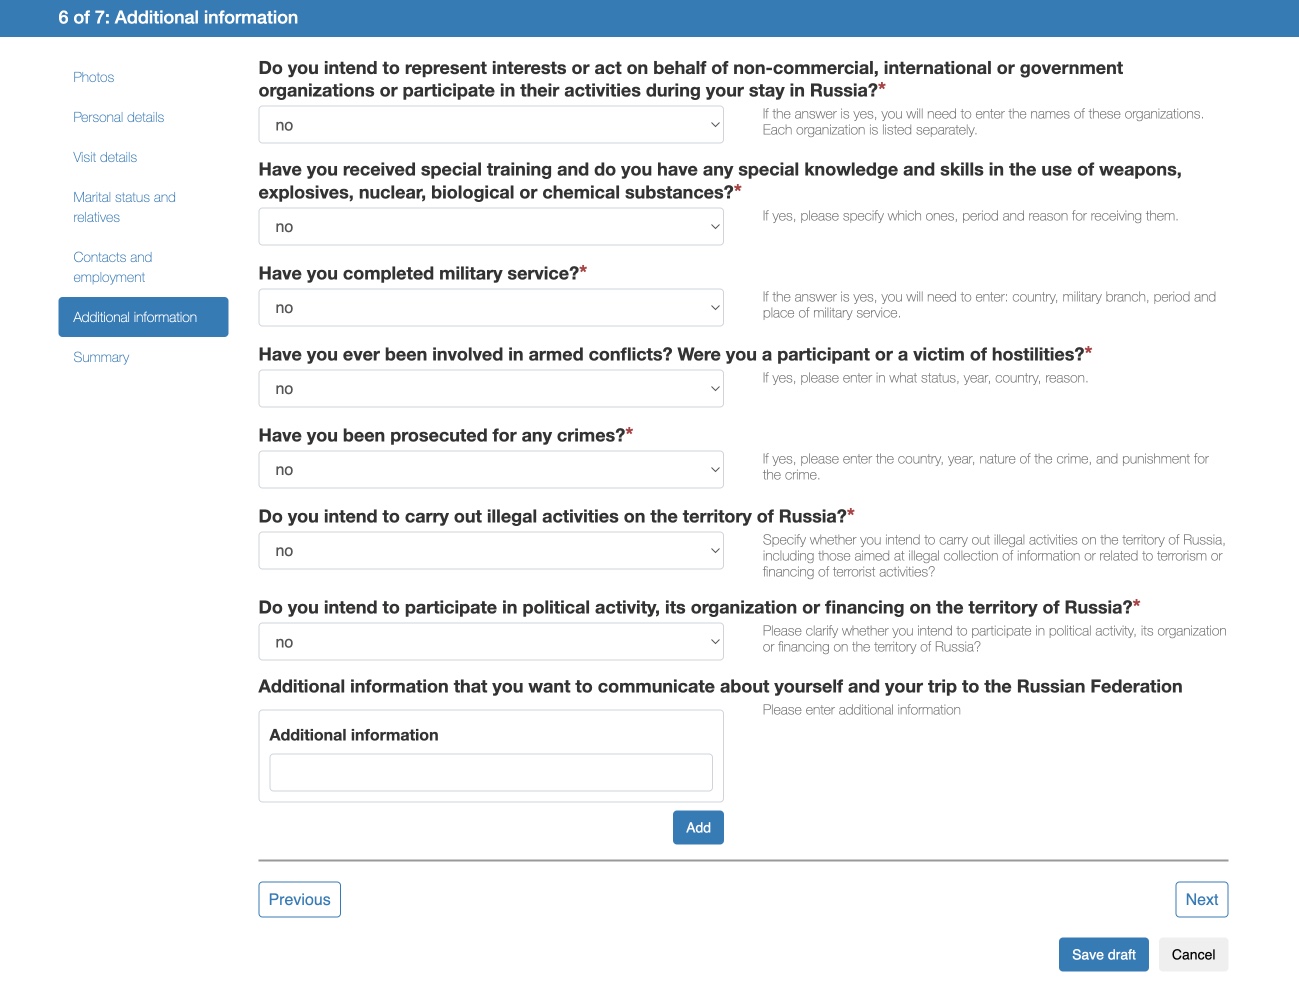
4.6. Additional Information
Finally, you’ll need to answer some personal questions.
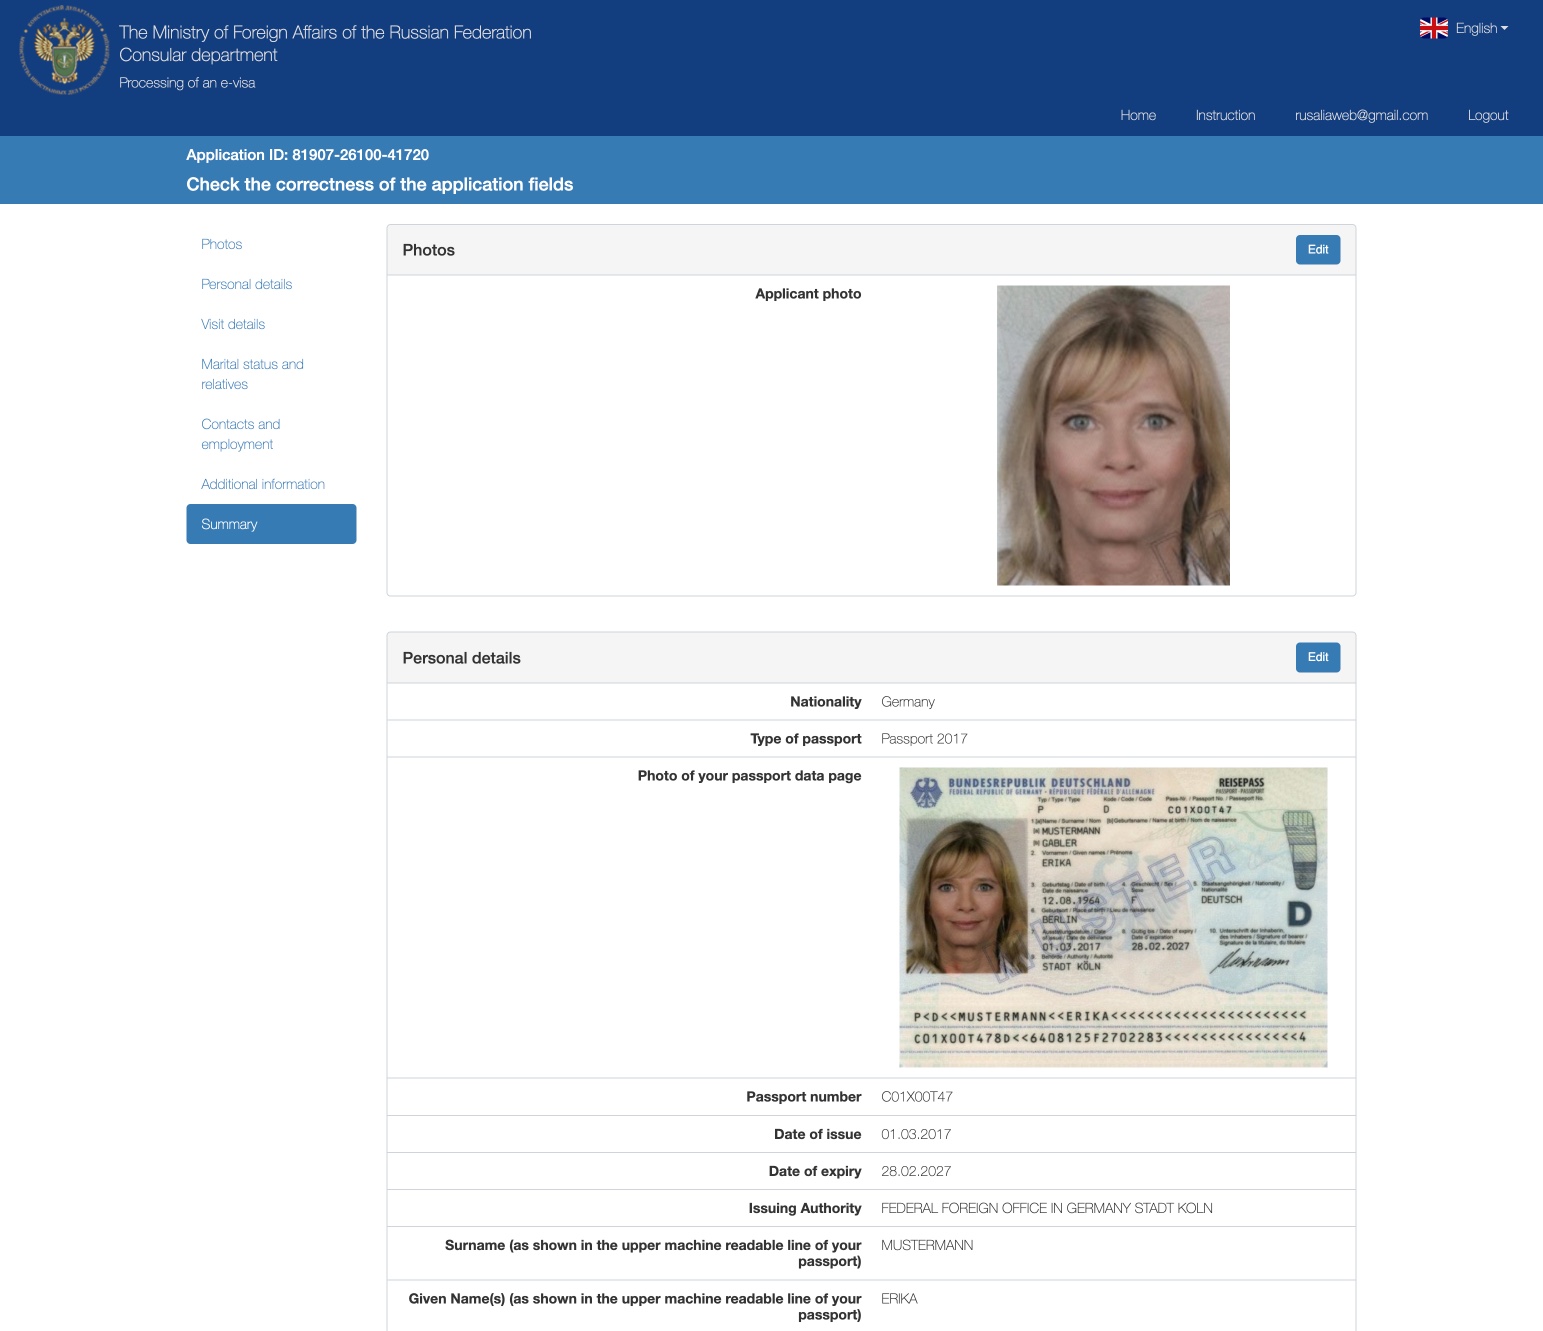
4.7. Summary
In the last step you will see a summary of everything you have indicated in your application. Check that all data is correct and accept the conditions for the electronic visa application. The last part of the process will be to click on the “Save and submit” button.

4.8. Consular fees
The last part of the process will be to pay consular fees by bank card.
Due to international sanctions and to facilitate payment for foreign tourists, the Russian Government has set up two payment platforms, one to pay with Chinese yuan and the other to pay with United Arab Emirates dirhams (called Telr)
You can pay with Visa, MasterCard or JCB cards issued abroad. Sometimes the payment fails, so you’ll have to try another card.
Once the payment has been made, all you have to do is wait for your visa to be granted.

4.9. Monitoring the status of your visa application
You can track the status of your application on the website of the Ministry of Foreign Affairs of the Russian Federation with your username and password.
Once the Russian authorities make a decision, the status of your request will change to “Visa issued” or “Visa denied”
The deadline for the issuance of the electronic visa is less than 4 calendar days from the date of sending the completed form. If you haven’t received a notification of concession or refusal of electronic visa within four days, then you can apply for a visa, according to the standard procedure at the consulate or at the Russian visa center.
4.10. Receive your visa in PDF format
The most normal thing is that in less than 4 days, you will receive an email that you have been granted the visa with a link by which you can download it in PDF format.
You must print this PDF file in color in A4 format, although you can also save the PDF file on your mobile and show it upon entering Russia.
Here is an example of an electronic visa:
3. ARRIVING TO RUSSIA
Now that you have your visa and your travel insurance, you should know that as soon as you arrive in Russia, you have to follow the following steps and procedures:
Step 1. Passport control and immigration card
As soon as you get off the plane you will pass through passport control in immigration counters or booths enabled for that purpose. There are two different lines, one for Russian nationals and one for foreigners.
The procedures for passport control, if there are not many arrival flights at the same time, usually take no more than 15 or 30 minutes. If there are more arrivals and many people (usually in summer), then it’s not uncommon that you have to wait an hour or more.
At these counters a number of immigration officials (usually women) will thoroughly review your passport to verify that the data is correct and that it has no amendments.
If you are wearing a cap, sunglasses or something that covers your face, take it off, since immigration agents will carefully check that the photo in the passport is yours.
At the border control points, you must submit the following documentation:
- Passport
- Electronic visa printed in color on an A4 sheet. You can also save a copy of the electronic visa on your mobile and show it to the customs agent.
- Travel medical insurance
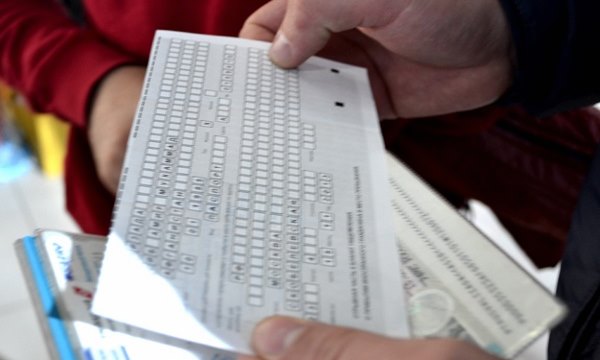
After the control, the customs officer will complete the so-called immigration card. You can find a detailed explanation of the immigration card in this article: Russian airports: the immigration card and customs procedures.
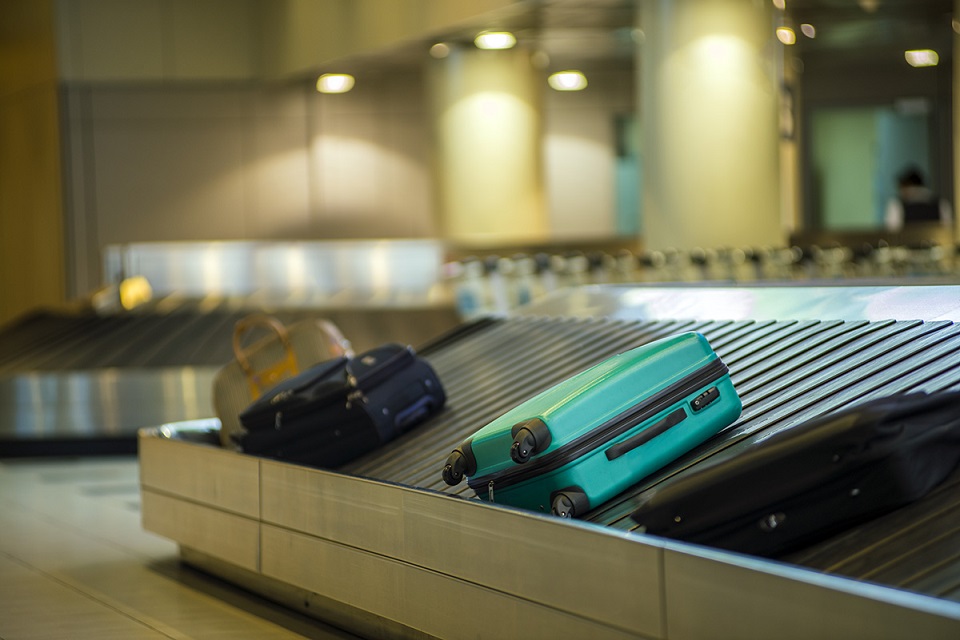
Step 2. Picking up the luggage
Once you have passed through the passport control, you can go to the baggage claim area. If the passage through the passport control area was fast you may have to wait a little while to get your bags out, but if passport control was slower, then your bags will be already waiting for you.
The odds of losing your luggage at a Russian airport are no greater than at any other airport in the world, since it depends more on the airline you travel with and your flight connections, than on anything else.
Step 3. Customs Control
After picking up your bags you will pass through customs. There are two corridors, the green one, if you have nothing to declare, and the red one, if you have something to declare.
In general, most tourists who travel to Russia have nothing to declare and go through the green corridor. However, in certain cases it is necessary to go through the red corridor and fill out the customs declaration form: if you carry more than 10,000 dollars (or the equivalent in other currencies), if you carry alcoholic beverages and beer in an amount greater than 3 liters, if you carry more than 200 cigarettes, etc.
More information on limitations and restrictions in this article: Russian airports: immigration card and customs formalities
Step 4. Registration in Russia with the unified e-visa
The registration is basically the process by which the Russian authorities are notified, after your arrival in Russia, of the place where they can find you if needed.
Registration is always the responsibility of the host (hotel, apartment, etc.), which must be a Russian citizen or a foreign citizen with permanent residence in Russia.
Is it mandatory to register in Russia with an e-visa? It depends.
If you are staying in Russia 7 business days or less, you don’t need to register. Weekends (Saturdays and Sundays) or the holidays don’t count as business days. For example, if you arrive in Russia on Saturday, August 1 and leave on a Monday, August 10, then you don’t need to register since your stay will be 6 business days.
Registration is required when you are going to be more than 7 business days in Russia.
More information in this article: Registration in Russia: What it is and how it is done
I hope this article has helped you apply for your electronic visa. Below you can tell us your experience.